Now's the time to be making the most of this year's bumper crop of apples and pears and here's a special autumn treat. This traditional French fruit tart looks and tastes so good. It's really easy to make and, because it's made with eating apples and ripe pears, it's sweet enough without adding sugar!
As well as being sugar free, it's also free from eggs and dairy too. The shortcrust pastry is made with flour and equal quantities of vegetable fat and dairy free margarine with a hint of cinnamon for added flavour. The fruit is cooked to make a rich, smooth filling without losing the lovely fresh flavour of an autumn harvest!
A French pâtisserie recipe that's healthy and simple? Must be too good to be true, surely? Why not make it for yourself and see!
225g plain white flour
55g vegetable fat (Trex)
55g dairy free sunflower margarine (Pure)
½ tsp cinnamon
pinch salt
About 700g sweet eating apples
About 700g ripe pears
1 large orange
50g dairyfree margarine
Start by preparing the fruit. Peel the apples and pears and leave whole. Then using a coarse grater, grate each piece of fruit into a large bowl, discarding the core and seeds.
Using a fine grater, remove the zest of the orange and add to the bowl with 3 tbsp of the freshly squeezed orange juice.
In a large non-stick frying pan, gently heat 50g dairy free margarine.
When it's melted, add all the grated fruit and stir well.
Cook over a high heat, stirring constantly!
After about 10 minutes or so, the moisture from the fruit will have evaporated and the mixture will have thickened, so much so that when you run the spoon across the pan, there is no juice remaining!
Set aside the fruit mixture whilst you make the pastry (or you can always make it the day before and keep in the fridge).
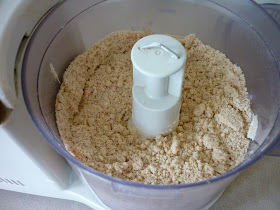
For quickness, I often make pastry in a food processor. Measure the flour, vegetable fat and margarine and place in the processor with the salt and cinnamon. Process briefly until the mixture resembles bread crumbs.
Add 3 tbsp water slowly through the funnel at the top whilst the machine is running. As soon as you see the pastry coming together to form a ball, switch off. It's best not to overwork the pastry.
(If you prefer to make the pastry by hand, sift the flour and cinnamon into a large mixing bowl and add a pinch of salt. Place the vegetable fat and margarine in the bowl and chop into small pieces with a knife. Then using your fingers, rub the fat into the flour until it becomes crumbly and resembles breadcrumbs. Add about 3 tbsp water and, using the knife again, mix together to form a soft dough.)
Dust your work surface with a little flour, then roll out the pastry thinly into a rough circle shape approximately 2 - 3cm larger than the greased shallow 24 cm loose-bottomed flan tin.
Carefully transfer the pastry to the tin. I find the best way to do this is to roll the pastry loosely round a rolling pin and then lift it into the prepared tin.
Ease the pastry into position and make sure no air is trapped underneath. Gently strengthen the sides to avoid it shrinking down when baked and trim away the excess pastry with a knife.
Either cover and leave in the fridge until needed or bake straightaway.
Prick the base of the flan all over with a fork, place a piece of foil or greaseproof paper on top and fill with baking beans (any dried beans) to stop the pastry base from puffing up whilst baking.
Place on a heated baking sheet in the oven at 200C (G.M. 6) and bake for 15 minutes, then remove the beans and foil and place the flan base back uncovered in the oven for 5 more minutes or till completely cooked through but not brown.
Fill the pre-baked pastry base with the cooked fruit mixture and level the top neatly with a knife.
If you like, you can make lattice strips to decorate the top. Roll out the pastry trimmings and cut into even strips with a pastry cutter or knife.
Lay 5 parallel strips vertically over the filling, then fold two alternate strips away from you.
Place the first strip horizontally across the middle, then replace the two verticals.
Fold the other three vertical strips towards you and place a second one horizontally. Replace the vertical pieces.
Fold the three vertical strips away from you and place a third strip horizontally. Then replace the vertical ones. Continue with the two remaining strips to form the lattice.
Here it is completed! Don't worry about the rough ends. You can tidy them up later.
Brush the pastry strips with a little cold water and return the tart to the oven. Bake for a further 20 to 25 minutes until golden. Serve on it's own, with natural soya yogurt or Swedish Glace non-dairy icecream.
Let me know what you think!


No comments:
Post a Comment